Using MIL Geometric Model Finder masks
Pattern recognition is used to locate an object in an image. For that reason, it is one of the most widely used operations in the machine vision industry. While the normalized grayscale correlation (NGC) technique uses a pixel-by-pixel comparison, the MIL Geometric Model Finder (GMF) uses a technique based on the geometric features of an object. GMF is not only more flexible, but also more tolerant of lighting variations, model occlusion and variations in scale and angle. One way to get even better results with GMF is to apply masks to the search model. This Vision Squad article describes how to use the various masking capabilities of GMF so that the tool can be used to its full potential.
Determining model and target coverage
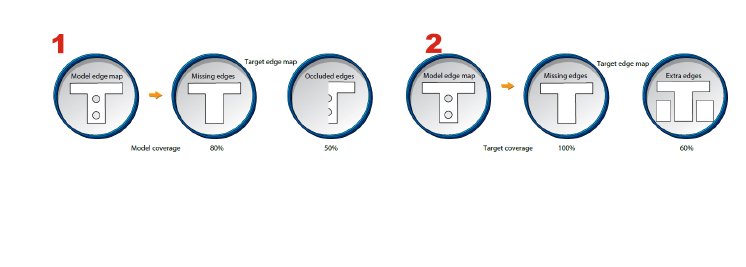
The model coverage quantifies the model’s edges found in the occurrence or target. Model coverage of 100% means a perfect match, where every edge element in the model image has found a corresponding edge element in the target. Missing or occluded edges in the target decrease the model coverage. In Figure 1, 80% of the model’s edges are found in the first occurrence and 50% in the second.
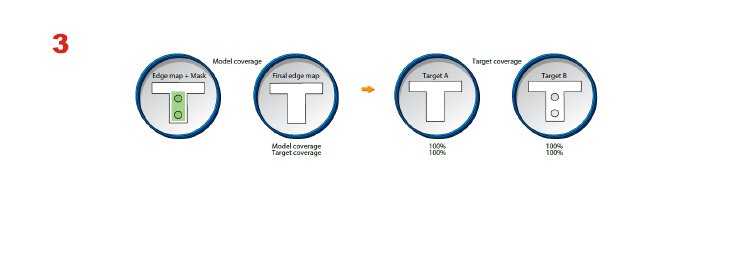
The target coverage quantifies the percentage of the target occurrence’s edges present in the model. This means that edges that are found in the occurrence but not in the model are considered extra edges. Therefore, they reduce the target coverage. In Figure 2 the target coverage is 100% in the first occurrence because all of the target edges correspond to edge elements in the model. In the second occurrence, the target coverage is lower because only 60% of the target edge elements correspond to the model’s edge elements.
Masks
Masks are applied to models for two reasons: either to remove any irrelevant, inconsistent or featureless areas of the model, or to modify the relative contribution of model edges to the model coverage. The GMF module provides three types of masks that have different effects on model coverage: don’t care, flat region and weighted.
Don’t care mask
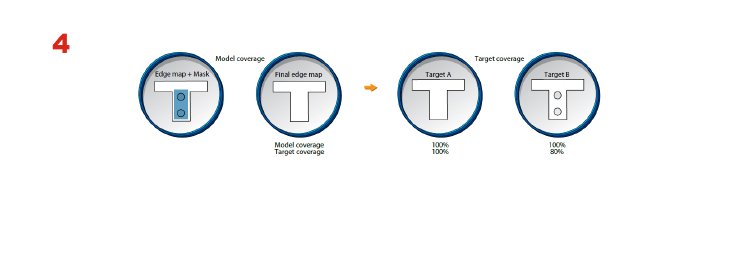
The don’t care mask (M_DONT_CARES) masks any irrelevant regions in the model and the corresponding region in the target. Masked edges in the model do not contribute to the model coverage, and any edges in the target’s corresponding region will not contribute to the target coverage (Figure 3).
In Target A, both the model and target coverage score 100% since all edges of the model are found in the target and vice-versa. In Target B, the model coverage is 100% because all edges of the model are found in the target; the target coverage is also 100% because the two circles fall within the corresponding region masked by the don’t care mask.
Flat region mask
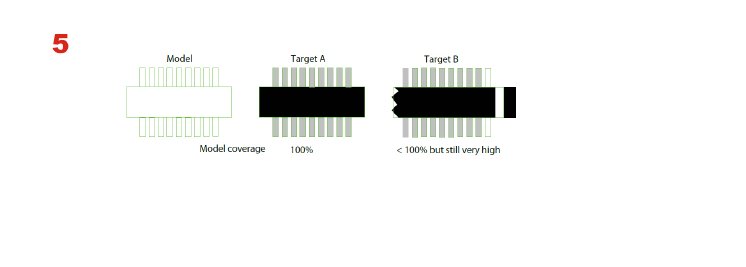
The flat region mask (M_FLAT_REGIONS) is used to mask the model edges only. Note that the corresponding target edges that fall in the masked area still contribute to the target coverage when using a flat region mask.
In Target A, both the model and target coverage score 100% since all edges of the model are found in the target and vice-versa. In Target B the model coverage is 100% because the remaining edges in the final model are found in the target; however, the target coverage decreases to 80% because of the extra edges (Figure 4).
Additional tips:
Use the following guidelines to maximize the effect of don’t care and flat region masks on both model and target coverage:
- Use don’t care masks to remove edges that lie “outside” the model geometry (sometimes associated with background noise). This will prevent these model edges and any irrelevant edges found in the corresponding target region from lowering the model and/or target scores.
- Use flat region masks to remove edges that lie “inside” the model geometry. Such edges may be associated with extra geometry, for example, that could indicate an error in the manufacturing process; therefore these edges must be reflected by the target coverage.
- If masked regions overlap, don’t care regions take precedence over flat regions.
- Masks usually speed up the matching process because they reduce the number of edges to process during a matching operation.
Weighted mask
One very useful application of the weighted mask (M_WEIGHT_REGIONS) is when a model contains a major repetitive pattern. Models based on repetitive patterns can generate unstable results in real images. For example, false positives are possible simply because the occurrence might have a “better” coverage than the desired match due to some missing or extra or occluded edges, or have coverage above the certainty threshold set by the user. A target can get ‘better model coverage’ because the omission of a few elements of the repetitive pattern does not significantly lower the model coverage (Figure 5).
The model coverage for Target B in Figure 5 is still high enough to be considered a match because the extra geometries offset the desired match without significantly reducing the model edge elements found in the target.
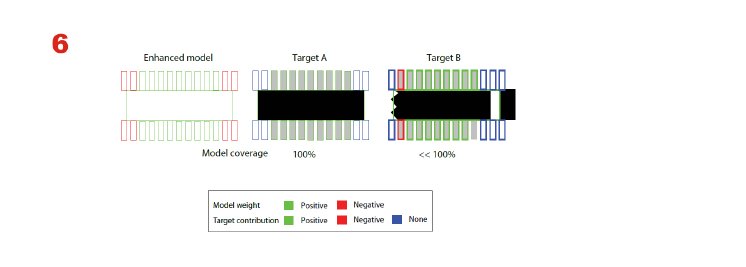
A weighted mask adjusts an edge element’s importance when the model coverage is calculated. Target edges that match model edges with negative weights will be ignored when the target coverage is calculated. To reduce ambiguity in repetitive patterns, first add “virtual” copies of the pattern. Then, mask the copies with negative weights. (Figure 6)
The enhanced model has eight “pins” that have a negative mask (red lines). When the model assesses Target B in Figure 6, the negative weights significantly lower the model coverage of the misaligned/offset candidate, enough to reject this occurrence as a match (depending on the acceptance/certainty thresholds set by the user). Therefore, even though the model is offset in Target B, the negative weights ensure the occurrence does not count as a match; only the desired match (Target A) will receive a high model score.
Link to Matrox Imaging Library Overview:
http://www.rauscher.de/...
VISION 2010
Hall 4, Booth 4c15
For more information please contact:
RAUSCHER
Johann-G.Gutenberg-Str. 20
D-82140 Olching
Phone +49 81 42 / 4 48 41-0
Fax +49 81 42 / 4 48 41-90
E-Mail: info@rauscher.de
www.rauscher.de
